Intro
For the past year, we have been self-hosting CGWire’s Kitsu, a project management package for animation, VFX and games that helps us plan, track and collaborate remotely on our creative projects.
Kitsu was recently updated to Version 4.0.0, which introduced major backend changes, including an upgrade to PostgreSQL 18 and a newer Meilisearch-based indexer, alongside clearer and more structured self-hosting documentation.
However: Using just the documentation, the install using their build script didn’t quite work on our server, as the build script assumes that Docker Compose will implicitly load an env file. This did not occur in our setup, because Docker Compose only auto-loads .env by default. This caused required variables (such as DB_VERSION) to appear missing.
The following is a walk-through through our process of deploying the official Docker version of Kitsu (available here) and its backend service Zou, PostgreSQL, Redis, and the Meilisearch-based indexer. We use Caddy as our reverse proxy, and set up SMTP to enable onboarding of accounts.
Who can do this?
This short guide is perfect for small teams or pipeline developers wanting to try self-hosting of Kitsu vs signing up to Kitsu’s paid cloud service. Some experience of running a Linux server will be useful here, although we’ve tried to break down the steps as much as possible. As every set-up is slightly different, what worked for us might need to be adjusted for your specific environment.
Our server set-up
Server with Linux Ubuntu 24.04 LTS
Docker Engine installed and running.
DNS of records pointing to the chosen sub-domain e.g. https://kitsu.your-domain.tld
In this deployment example, we use:
Multi-Docker container environment,
Caddy as the reverse proxy (wildcard certificate setup),
VSCodium for editing and remote work.
For authoritative reference, always consult the upstream repository. We pulled the code from here and used their readme install instructions, but we needed to tweak them: The upstream documentation is excellent and clear, but assumes a minimal, local setup. In a cloud environment with a reverse proxy, explicit networking, and external SMTP, a few additional steps are required.
Our notes assume a fresh installation on a clean server.
Walkthrough
Create and enter the new CGWire (Kitsu) directory
mkdir -p ~/docker/cgwire && cd ~/docker/cgwire(Creates the directory structure and navigates into it.)
Clone the docker-cgwire repository
your@server:~/docker/cgwire$ git clone https://gitlab.com/mathbou/docker-cgwire.git . (Clones the docker‑cgwire repository into the current directory.
The final . prevents Git from creating an extra subfolder.)
your@server:~/docker/cgwire$ git fetch --tags && git checkout 4.0.0(Best practice: even on a fresh clone, explicitly checking out the release tag ensures you are deploying a known, reproducible version rather than whatever happens to be on main.)
When a new release is published (e.g., 4.1.0), to update:
your@server:~/docker/cgwire$ git fetch --tags && git checkout 4.1.0(Fetches the latest tags from the remote and switches your working directory to the new version.)
Set environment variables
Next, we need to generate secure credentials for PostgreSQL and the Meilisearch indexer in the environment file.
Open the env file:
your@server:~/docker/cgwire$ vim env
As PostgreSQL 18 is required by Kitsu 4.0.0 and is not backward-compatible with older database images, we specify DB_VERSION=18 and the data path below. Replace the default passwords with your own secure ones.
DB_VERSION=18
DB_DATA_PATH=/var/lib/postgresql
DB_PASSWORD=Un53cur3Pa55w0rd (replace the password!)
INDEXER_VERSION=v1.31
INDEXER_KEY=Un53cur3Ma55t3rK3y (replace the indexer key!)
INDEXER_HOST=indexer
SMTP email wiring
This step adds SMTP credentials to enable email notifications and onboarding. These settings enable Kitsu to send onboarding emails, notifications and password resets.
MAIL_SERVER=smtp.your-email-provider.tld
MAIL_PORT=587
MAIL_USERNAME=you@your-domain.tld
MAIL_PASSWORD=your-email-smtp-password (this is the password you get from your email provider for the SMTP functionality)
MAIL_USE_TLS=True
MAIL_DEFAULT_SENDER=admin@your-domain.tld
Save and exit.
Bring the stack up
Docker Compose automatically pulls the required images (Kitsu, Zou, PostgreSQL 18, Redis, and Meilisearch) if they are not already present.
Docker Compose also only auto-loads .env. We therefore rename the provided env file to .env so that standard docker compose up -d commands work reliably.
Rename the env:
your@server:~/docker/cgwire$ mv env .envRestart the stack using the default docker command:
your@server:~/docker/cgwire$ docker compose up -dWait for core dependencies to be healthy
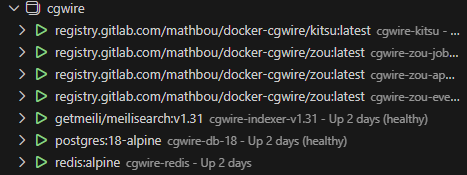
Setting up Kitsu with Docker actually involves seven containers.
After bringing the stack up, give the containers a few minutes to initialise.
Then check their status:
your@server:~/docker/cgwire$ docker ps(Shows all running containers and their health/state indicators.)
If they’re not running properly, check your process up to here.
Create the zoudb database
Enter the Postgres container:
your@server:~/docker/cgwire$ docker exec -it cgwire-db-18 shOpen the Postgres shell:
# psql -U postgres Create the database inside the Postgres instance:
# CREATE DATABASE zoudb; Quit the Postgres shell:
# \qExit the container:
# exit
Initialize Zou app container
Enter the container:
your@server: ~/docker/cgwire$ docker exec -it cgwire-zou-app shInitialize the database schema:
# zou init-dbPopulate initial data (statuses, task types, asset types, etc.):
# zou init-dataCreate an admin user:
# zou create-admin admin@your-domain.tld --password 'Your-Password'Exit the container:
# exit
Run the search indexer
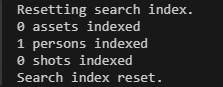
After creating your admin account, reset and rebuild the search index to verify that the user was created correctly. This step verifies that the backend, database, and indexer are all communicating correctly:
your@server: ~/docker/cgwire$ docker exec -it cgwire-zou-app zou reset-search-index
Expected output. Seeing “1 persons indexed” confirms that your admin user has been successfully created.
Caddyfile edits
As we are running Caddy as a reverse proxy, we need to add the subdomain pointing to the Kitsu instance, so that remote users can access Kitsu once they have the necessary permissions.
In your Caddyfile insert the following block with the sub-domain (kitsu in this example) that corresponds to your DNS records:
        @kitsu host kitsu.your-domain.tld
	handle @kitsu {
		reverse_proxy cgwire-kitsu:80
	}
Validate the syntax and reload the Caddyfile using the following commands:
your@server:~/docker/caddy$ docker exec caddy caddy validate --config /etc/caddy/Caddyfile

your@server:~/docker/caddy$ docker exec caddy caddy reload --config /etc/caddy/Caddyfile
Caddy/subdomain set-up
Caddy runs on a dedicated external Docker network (named proxy). Application containers must join this network to be reachable by the reverse proxy.
Add the proxy network in the Docker compose file:
your@server: ~/docker/cgwire$ vim /docker/cgwire/docker-compose.ymlIn the Kitsu block under Run All Services add the Caddy proxy network:

and at the end of the file under networks add:

This connects Kitsu to both an internal Docker network and the external proxy network managed by Caddy.
Save and exit.
Restart the stack one final time
your@server: ~/docker/cgwire$ docker compose up -dConclusion
Deploying Kitsu 4.0.0 via Docker is now significantly easier than in previous versions, but real-world deployments still require attention to environment variable loading, explicit database initialization, and Docker networking when used behind a reverse proxy.
The key differences from the default documentation were ensuring PostgreSQL 18 compatibility, explicitly managing environment files, manually creating the Zou database, and attaching Kitsu to an external proxy network.